Reading Device Data via MQTT
Connio’s built-in MQTT broker enables external systems, when granted the appropriate permissions, to access all device properties in real time with read-only privileges. Only devices have permission to write their own data via the MQTT broker.
A public property in a device profile, configured with the publish attribute set to always or changed, acts as a bridge for sending data to devices via MQTT. When properly configured, external systems—such as Connio users or API clients—can send data and commands to devices by writing to these public properties through Connio’s REST API. This design overcomes MQTT’s lack of built-in access control through a hybrid approach that integrates MQTT with Connio’s permission management system.

Please note that in this document, we sometime use the term Device Mirroring to highlight the read-only nature of our approach and to differentiate it from typical MQTT broker behavior.
Connecting Directly to a Device
Starting with Connio version 4.5, you can directly access a device’s full state or an individual property—no need to plug the device into an app anymore.
Connio creates a topic for each device on the built-in MQTT broker, with a path prefixed by the account name, unless the device is explicitly excluded (see Customization section).
The default data representation for a device is a per-property view. Unless you configure a custom view using tagging mechanism (see below), device properties can be accessed by subscribing to the topic for each property.
{account-name}/devices/{device-id}/properties/{property-id}
alternatively, you can subscribe to all properties at once
{account-name}/devices/{device-id}/properties/#
You can also customize how property values are displayed. By default, the representation is raw (or classic), showing only the data value. Alternatively, you can choose the data point format, which presents the property value as a timestamp–value pair.
To access the full device state instead of individual properties, set the @@mirror_data=STATE tag on the device. The key difference between a STATE view and a Property view is that, in a STATE view, any property change triggers the delivery of the complete device state rather than only the updated property value.
{account-name}/devices/{device-id}
You can control how the device data is represented by adding special tags to a device settings:
| Tag | Entity | Description |
|---|---|---|
| @@do_not_mirror | Device | Exclude device from the broker |
| @@mirror_data=STATE | Device | Show full device state |
| @@mirror_prop_data=DP | Device | Show property data as data point |
| @@mirror_apps= | Device | A comma-separated list of the app names the device is plugged into, enabling MQTT access within the app topic path. Without this tag, the device will not publish its data under the topic path of any app it is plugged into. This tag allows more granular control over which app's topic path this device is being displayed. |
| @@do_not_mirror | Property | Exclude a property from the broker to prevent it from sending unnecessary or large data, which could otherwise keep the broker busy. |
For example, if your account name is acme and you have a device named TestDevice.1 with the ID _dev_1234567890123456789, and it has two properties—temperature and humidity—you can subscribe to acme/devices/_dev_1234567890123456789/properties/# to receive notifications whenever any of the properties change.
If temperature is set to 23.0 by the device, you will see a topic acme/devices/_dev_1234567890123456789/properties/temperature and a value 23.0.
As mentioned earlier, if you want to see the property values as data point, you should add @@mirror_prop_data=DP tag to your device settings. In such case you see the following:
acme/devices/_dev_1234567890123456789/properties/temperature
[
  "2025-08-15T07:01:07.178Z",
  23
]
Now, imagine you want to access the full device state. In this case, you would subscribe to acme/devices/_dev_1234567890123456789 and add the @@mirror_data=STATE tag to your device settings. When you set the temperature property to 23.0—and assuming the initial value of humidity is 19%—you will receive the following topic and value from Connio’s MQTT broker:
acme/devices/_dev_1234567890123456789
{
  "temperature": 23,
  "humidity": 19
}
You can also customize topic paths in Connio’s broker using the tagging mechanism. The following tags control this behaviour:
| Tag | Entity | Description |
|---|---|---|
| @@mirror_topic=NAME | Device | Uses the device name in the topic path instead of the device ID |
| @@mirror_prop_topic=ID | Device | Uses the property ID in the topic path instead of the property name |
| @@mirror_app_topic=NAME | Device | Uses the app name in the topic path instead of the app ID |
IMPORTANTAll account, app, and device names used in topic paths are case-sensitive.
In some cases, you may want to access devices as a group. In Connio, you can access device groups by associating (plugging) them into apps under the device settings. This approach also allows you to access data from multiple devices using a single API client with an App context and the appropriate scopes / permissions.
In its longest form, the topic path of a device exposed through an app looks like the following:
{account-name}/apps/{app-id}/devices/{device-id}/properties/{property-id}
As mentioned earlier, you can control both the topic path and the data representation using the tagging mechanism described above.
For example, if we group our test device under testapp with ID _app_9876543210987654321, we can access to our device data and other devices in the same group using a single API Client with Application context and device:read-data scope:
POST https://api.connio.com/v3/apiclients

{
  "name": "DataConsumer",
  "description": "An external client listening to data from devices in my app",
  "context": {
    "type": "app",
    "ids": ["_app_9876543210987654321"]
  },
  "scope": ["device:read-data"]
}
In this scenario, the API Client should connect to the broker using its credentials (API Client ID as the MQTT client ID, key ID as the username, and secret as the password) and subscribe to the device mirror topic:
acme/apps/_app_9876543210987654321/devices/_dev_1234567890123456789/properties/#
You can also subscribe to all devices under this app:
acme/apps/_app_9876543210987654321/devices/# or acme/apps/_app_9876543210987654321/devices/+
Note that # and + are MQTT standard wildcard characters.
Examples
In this section, we provide examples of how to use the tagging mechanism to customize topics and data representation. In our example, there is a single app, testapp, and a single device, TestDevice.1, plugged into testapp.
For the first example, we add the tag @@mirror_apps=testapp to our device's settings to enable device data publishing, then we subscribe (using the correct API client credentials and permissions) to acme/apps/_app_9876543210987654321/devices/#
When TestDevice.1 updates its property humidity to 18%, we get the following topic and value pair.
Topic: acme/apps/_app_9876543210987654321/devices/_dev_1234567890123456789/properties/humidity
Value: 18
Now, add @@mirror_topic=NAME to our device then subscribe to acme/apps/_app_9876543210987654321/devices/#.
When TestDevice.1 updates its property humidity to 18%, we get the following topic and value pair.
Topic: acme/apps/_app_9876543210987654321/devices/TestDevice.1/properties/humidity
Value: 18
Now, add @@mirror_app_topic=NAME to our device then subscribe to acme/apps/sample/devices/#.
When TestDevice.1 updates its property humidity to 18%, we get the following topic and value pair.
Topic: acme/apps/sample/devices/TestDevice.1/properties/humidity
Value: 18
Now, add @@mirror_data=STATE to our device then subscribe to acme/apps/sample/devices/#.
When TestDevice.1 updates its property humidity to 18%, we get the following topic and value pair additional to properties sub-topic-path.
Topic: acme/apps/sample/devices/TestDevice.1
Value:
{
  "humidity": 18,
  "temperature": 22
}
TIPIf you want certain tags to be added to your device by default during creation, this can be configured at the system level.
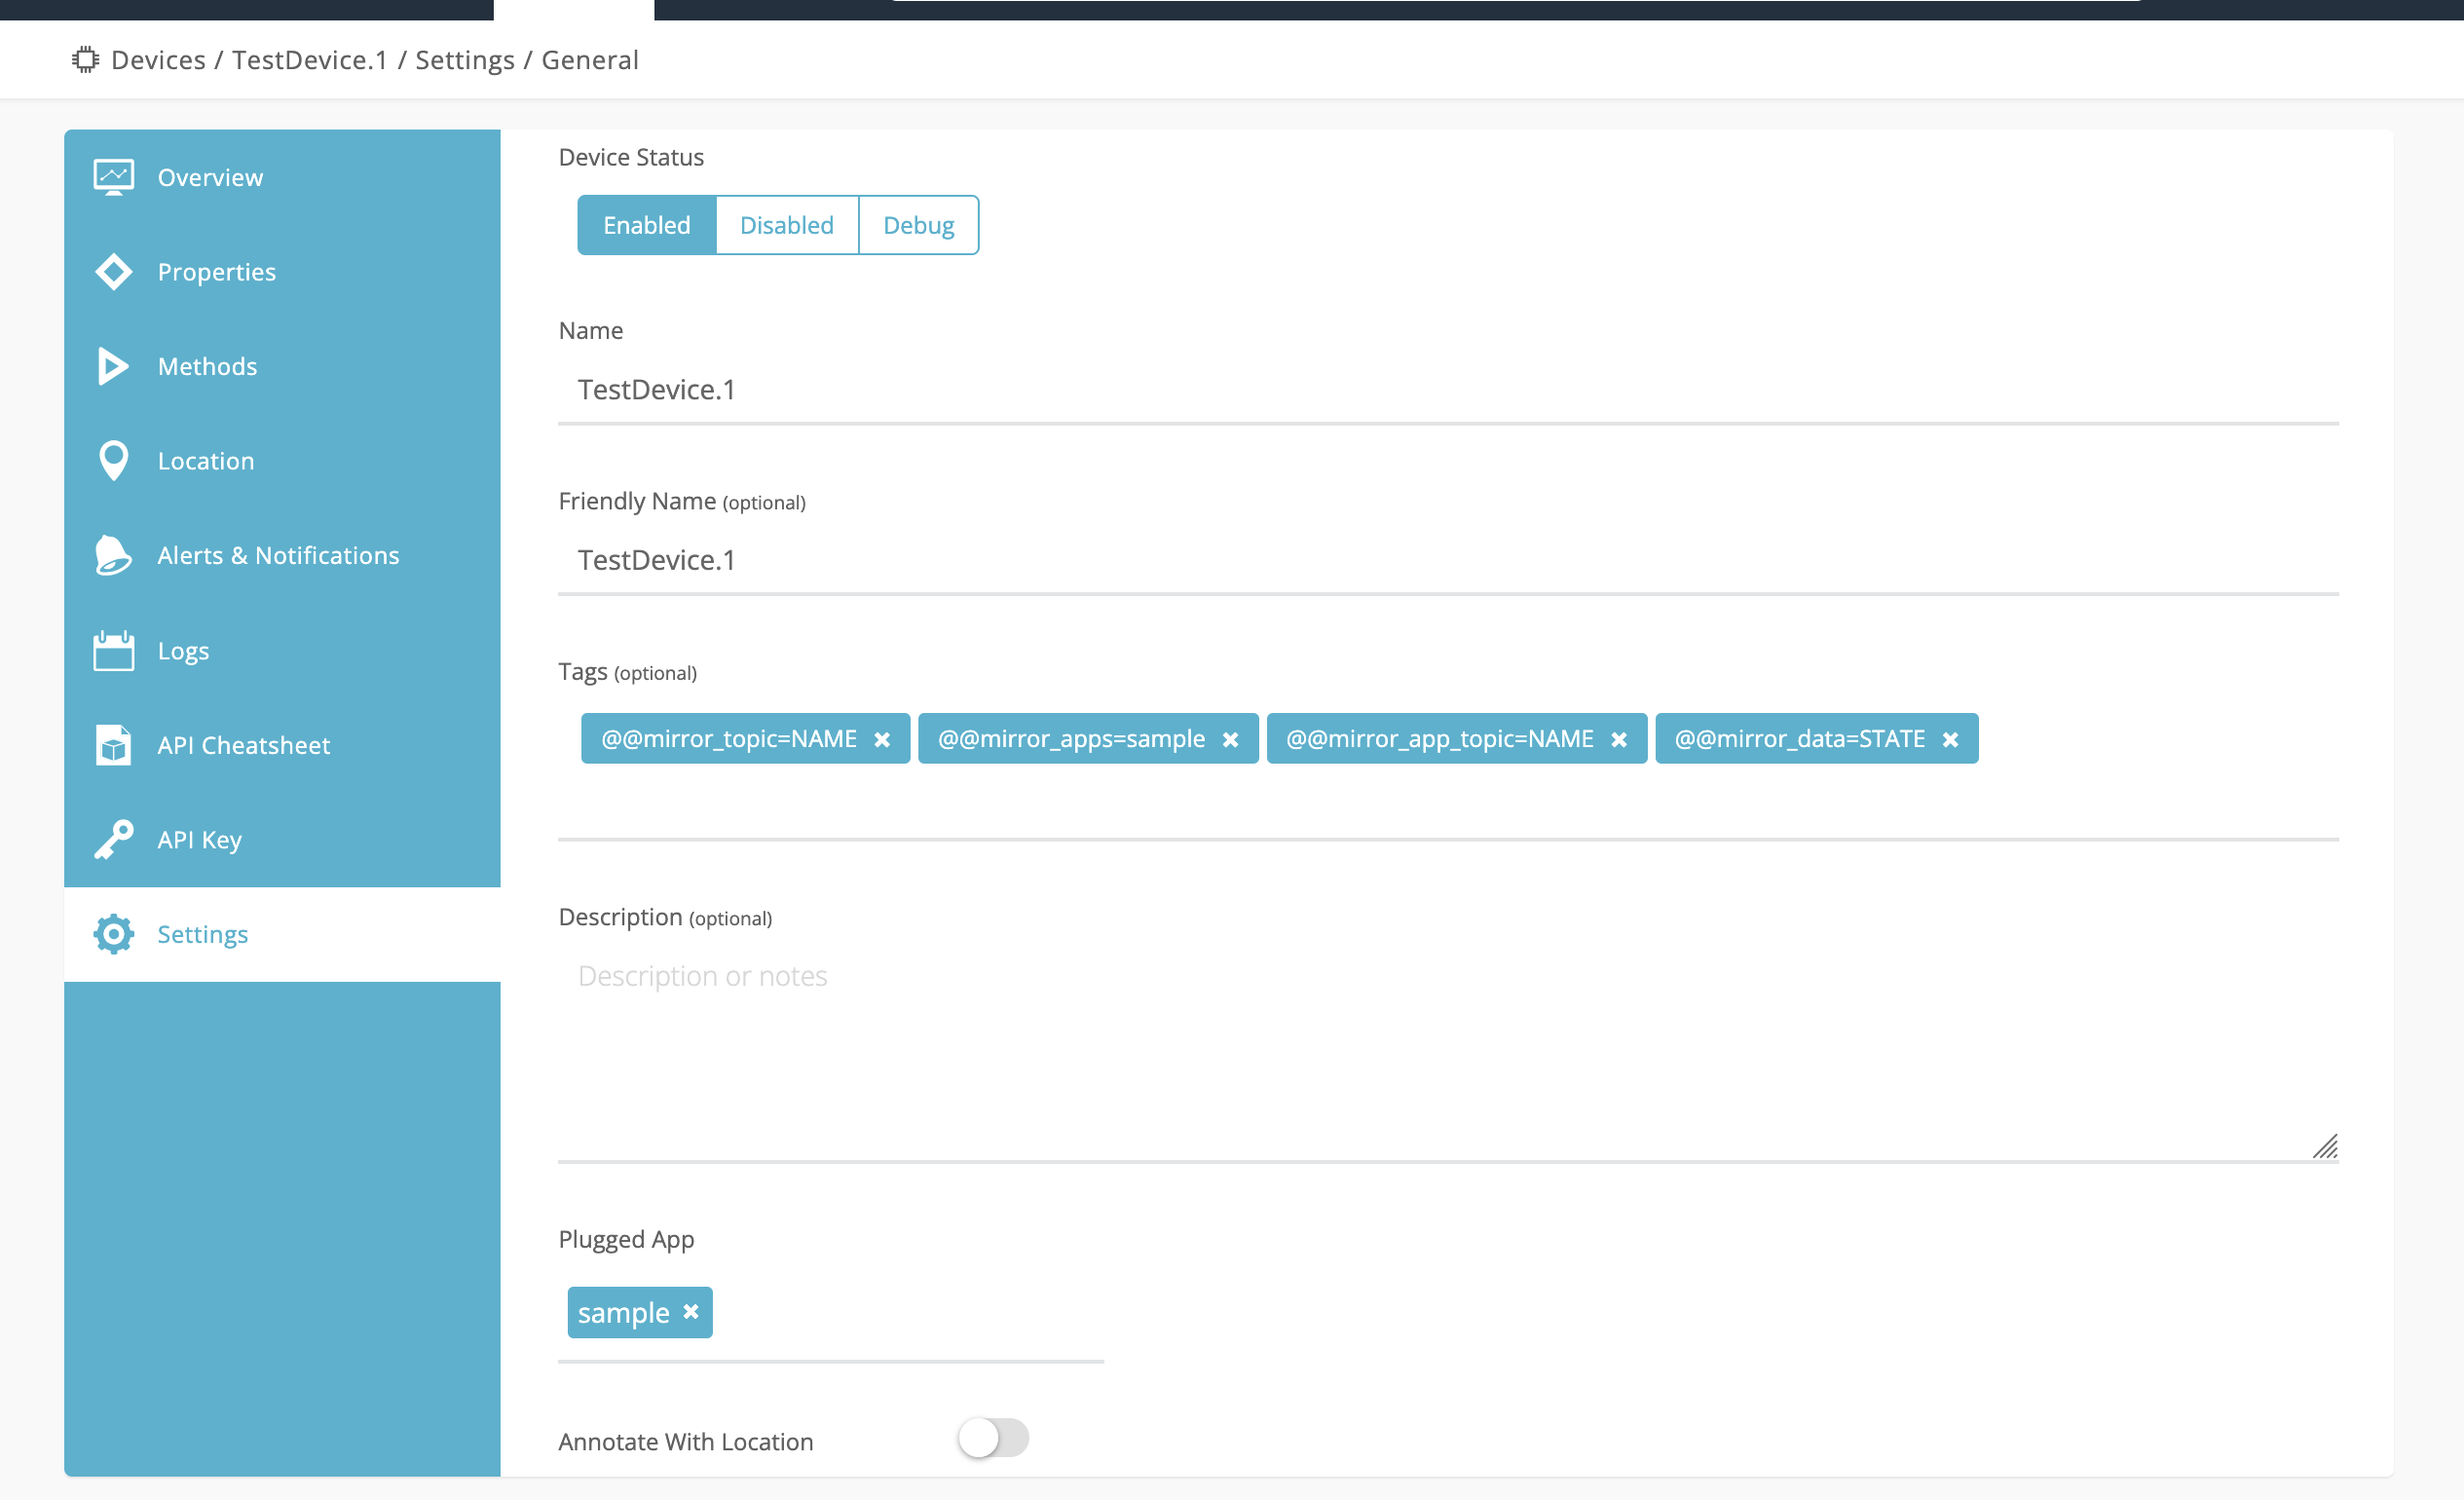
You see how to set tags in the device settings below:
Updated 12 months ago